Batch convert PDF, PLT, DWF, CGM, TIFF, JPEG and CALS
Batch convert your files using ViewCompanion
ViewCompanion can batch convert all the supported file formats, which includes PDF, PLT, CGM, DWF, TIFF,
CALS, JPEG, PNG and more.
The batch conversion feature in ViewCompanion is very easy to use, just open the dialog and start adding files and folders.
All sub folders of an added folder will be processed, and the tree structure will be maintained in the output folder.
By default, all supported files in each folder will be processed, but you can configure ViewCompanion to process a specific
file extension by using a mask, for example "*.plt".
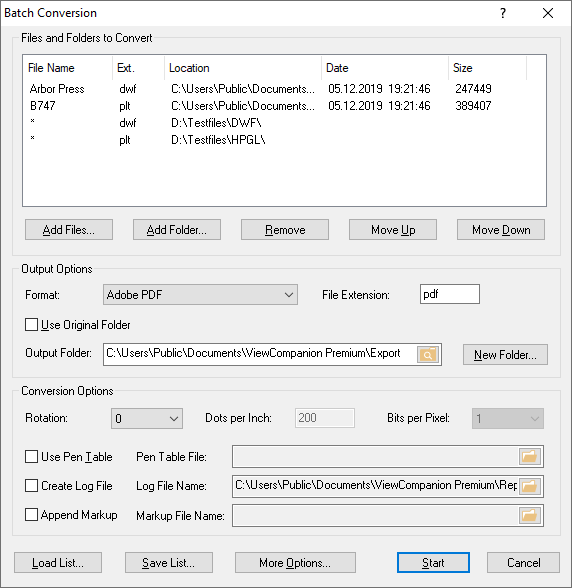
The picture below shows the batch conversion dialog:

In this example we've added two files and two folders to our batch. For the first folder we will process only files that have the
DWF extension, and for the second folder we've selected PLT files only. Output format is set to PDF.
If you want to convert to any of the raster formats, for example TIFF, you must set Bits per Pixel
option to match the number of colors you want, if you want to convert to black and white raster only, you should set this to 1.
For color raster the best result will be obtained by using 24 bits per pixel (True Color).
The Dots per Inch setting controls the resolution of the raster, a higher value gives better quality,
but the file size will increase as well.
When you've added the files and folders you need, you should check the More Options dialog, click the button at the bottom of the dialog to open it. Here you will find settings that control the dimension of the output files. You may select a specific scale (the default is 100%) or force the output files to match a certain paper dimension. Some of the other options available in this dialog include:
- Choose PDF output format: Standard editable PDF or PDF/A compliant.
- When selecting PDF/A, choose the desired conformance level: PDF/A-1b, PDF/A-2b, PDF/A-3b, PDF/A-2u, PDF/A-3u, PDF/A-4, PDF/A-4e.
- Select TIFF compression method: CCITT Group 4, Packbits, JPEG, Deflate, LZW or no compression.
- Select JPEG quality control.
- Passwords protection options.
- Log file configuration.
- Many other advanced options.
You can add annotations to the converted files by adding a markup file to the dialog. The markup files can either be a previously saved file, or you can
create one using the Software Companions XML Markup format. By using the XML format, you can add all
kinds of markup elements, including text, stamps, images and barcode annotations.
Here is a simple XML file that adds a QR barcode at bottom center of each page in each converted file:
<SCMarkupFormat>
<Header>
<Unit>mm</Unit>
</Header>
<Elements>
<Element>
<type>Barcode</type>
<barcodetype>QR</barcodetype>
<page>-1</page>
<center x="50%" y="25"/>
<size w="25" h="25"/>
<text>http://www.softwarecompanions.com</text>
</Element>
</Elements>
</SCMarkupFormat>
The are several sample markup xml files (with extension scmx) included in the installation and You will find these in a folder named:
"C:\ProgramData\Software Companions\Viewcompanion Pro\Markup XML".
These files can be easily modified using a text editor, like for example Windows Notepad.
The same files are also available in our GitHub repository:
https://github.com/SoftwareCompanions/ViewCompanion
ViewCompanion is available as three different editions: Standard, Pro and Premium.
All of them include batch conversion but the number of file format each of them support is different.
Please take a look at the ViewCompanion File Format comparison chart for a list of the formats supported by each edition.
Please use the links below for detailed information about a specific edition:
Read more about ViewCompanion Standard
Read more about ViewCompanion Pro
Read more about ViewCompanion Premium


